
Author: KayMomStudio

  • Disguise a Turkey Ideas: 30 Easy Ways to Help Tom Hide

    Disguise a Turkey Ideas: 30 Easy Ways to Help Tom Hide

    Every November, a familiar note comes home from school: “Your turkey needs a disguise so it won’t get eaten on Thanksgiving!” The Disguise a Turkey project is a classic family craft, and Kaylee and I are working on ours for school this year too. If you’re staring at a blank turkey wondering where to start, these disguise a turkey ideas will get your family’s creativity flowing.

    How the disguise a turkey project works

    Kids get a turkey template (from school or printed at home) and turn it into something that is definitely not a turkey, so the farmer won’t find it. They decorate it with paper, paint, fabric scraps and anything else in the craft bin, then write what their turkey is disguised as. Most teachers want the child to come up with the idea and do as much of the work as they can, with grown-ups helping.

    Step 1: Brainstorm together

    The best disguises come from what your child already loves. Ask a few questions:

    • What is your favorite animal, food or sport?
    • What do you want to be when you grow up?
    • Who is your favorite character from a book? (Then make your own version!)
    • What is the silliest thing a turkey could pretend to be?

    Write down every idea, even the funny ones. Then let your child pick the winner.

    30 disguise a turkey ideas

    Jobs and grown-up dreams

    • Chef: a paper chef hat and a tiny apron cut from a napkin.
    • Firefighter: a red paper helmet and yellow stripes on the body.
    • Astronaut: an aluminum foil suit and a clear plastic “helmet.”
    • Doctor: a white coat and a stethoscope made from yarn.
    • Scientist: a lab coat, safety goggles and a bubbling paper beaker.
    • Artist: a beret, a paper palette and paint splatters.
    • Farmer: the sneakiest disguise of all! A straw hat and overalls.

    Animals

    • Unicorn: a glitter horn and a rainbow yarn mane.
    • Dinosaur: green paper with triangle spikes down the back.
    • Bumblebee: yellow and black stripes plus wax paper wings.
    • Ladybug: a red paper shell with black dots.
    • Owl: brown paper feathers and big round eyes.
    • Penguin: black and white paper and an orange beak.
    • Puppy or kitty: floppy ears, whiskers and a pipe cleaner tail.

    Food (the turkey’s favorite trick)

    • Pizza slice: a cardboard triangle with paper pepperoni. Bonus points for an “EAT MORE PIZZA!” sign.
    • Ice cream cone: a waffle-print cone and cotton ball scoops.
    • Cupcake: a cupcake liner skirt and cotton ball frosting.
    • Pumpkin: orange tissue paper all over and a green stem hat.
    • Taco: a folded yellow shell with shredded paper “lettuce.”

    Sports and hobbies

    • Football player: a jersey with your child’s favorite number.
    • Soccer player: a paper soccer ball and shin guards.
    • Ballerina: a tulle or tissue paper tutu.
    • Rock star: sunglasses and a paper guitar.
    • Gymnast: a sparkly leotard made of foil or sequins.

    Pretend and seasonal

    • Superhero: a cape, a mask and a homemade logo.
    • Princess or prince: a crown, a cape and a wand.
    • Pirate: an eye patch, a bandana and a paper sword.
    • Wizard: a starry pointed hat and a magic wand.
    • Snowman: cotton balls, a scarf and a carrot nose.
    • Scarecrow: a straw hat and yarn “hay” sticking out.
    • Leaf pile: real fall leaves glued all over for perfect camouflage!

    Supplies you probably already have

    • Construction paper, cardstock and tissue paper
    • Cotton balls, pom-poms and craft feathers
    • Fabric scraps, felt, yarn and ribbon
    • Buttons, googly eyes, sequins and glitter glue
    • Aluminum foil, coffee filters and old magazines
    • Real leaves, dry pasta and egg carton cups

    Tips for a stress-free turkey project

    1. Read the teacher’s instructions first. Check size limits and whether 3D items are okay.
    2. Print on cardstock so the turkey holds heavy decorations.
    3. Let your child lead. It doesn’t have to be perfect. It has to be theirs!
    4. Sketch it first so you know which supplies you need.
    5. Use white school glue for heavy pieces and let it dry flat overnight.
    6. Take a photo before it goes to school. These make the sweetest keepsakes.

    Want everything in one place? Our printable Disguise a Turkey Kit includes bold turkey templates, 30 cut-out disguise pieces, a “My Disguise Plan” brainstorm page, a supply checklist, a turkey poem and a Master of Disguise award.
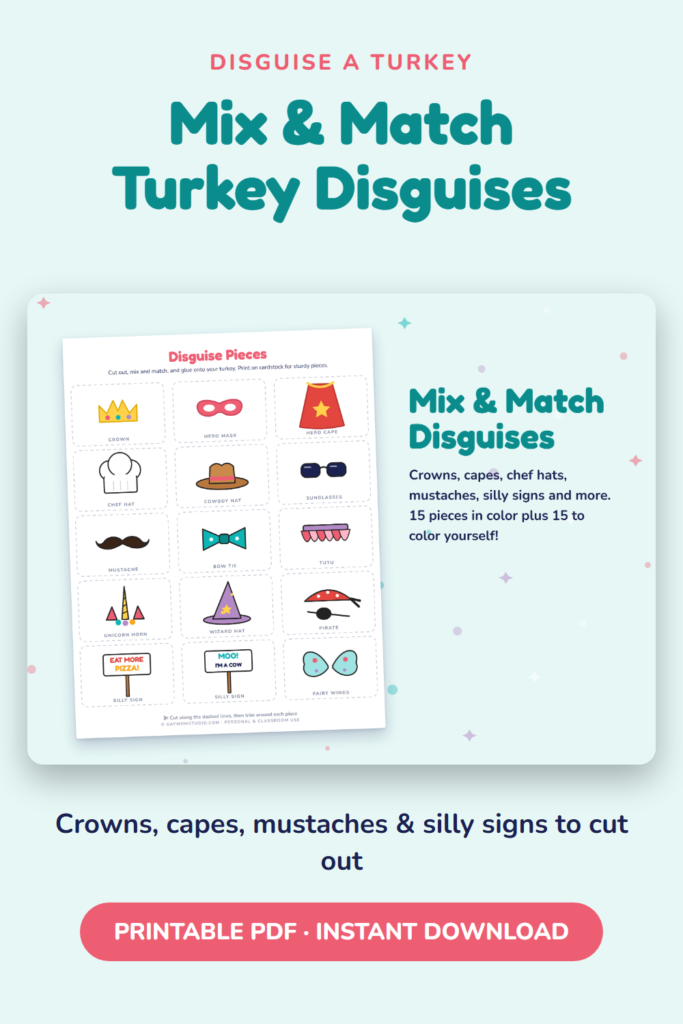
    Disguise a turkey printable kit with mix and match costume pieces

    Looking for more creative fun? Read about the benefits of arts and crafts for kids or try our easy paper crafts.
  • Easy Cut-Out Sugar Cookies to Decorate With Kids

    Easy Cut-Out Sugar Cookies to Decorate With Kids

    Rolling, cutting and decorating cookies is one of the best ways to bake together. These sugar cookies to decorate with kids are soft, hold their shape in the oven, and give kids a perfect blank canvas for icing and sprinkles.

    Ingredients

    For the cookies (about 24 medium cookies)

    • 2 3/4 cups all-purpose flour
    • 1 teaspoon baking powder
    • 1/2 teaspoon salt
    • 1 cup (2 sticks) unsalted butter, softened
    • 1 cup granulated sugar
    • 1 large egg
    • 1 teaspoon vanilla extract

    For the easy icing

    • 2 cups powdered sugar
    • 2 to 3 tablespoons milk
    • 1/2 teaspoon vanilla extract
    • Gel food coloring
    • Sprinkles and other toppings

    Instructions

    1. Mix the dry ingredients. Whisk the flour, baking powder and salt in a bowl. (Kid job!)
    2. Cream the butter and sugar. Beat until light and fluffy, about 2 minutes.
    3. Add the egg and vanilla and mix well. (Kids can crack the egg into a small bowl first.)
    4. Add the dry ingredients a little at a time and mix until a soft dough forms.
    5. Chill. Divide the dough in half, flatten into discs, wrap and refrigerate for at least 1 hour.
    6. Roll and cut. Heat the oven to 375°F (190°C). On a floured surface, roll the dough about 1/4 inch thick and cut out shapes. (The best kid job!)
    7. Bake on a parchment-lined baking sheet for 8 to 10 minutes, until the edges are just barely golden. (Grown-up job.)
    8. Cool completely on a wire rack before decorating.

    How to make the icing

    Stir the powdered sugar, vanilla and 2 tablespoons of milk until smooth. It should be thick but spreadable. Add more milk a few drops at a time if needed. Divide into small bowls and tint with food coloring.

    For kids, spreading icing with a butter knife or the back of a spoon is easiest. Older kids can try squeeze bottles or zip-top bags with a tiny corner snipped off.

    Decorating ideas

    • Sprinkle shake: ice a cookie, then shake on sprinkles over a tray.
    • Polka dots: dots of a second color on wet icing.
    • Faces and animals: candy eyes, mini chips and frosting details.
    • Stained glass look: outline with one color, fill with another.
    • Holiday shapes: hearts, stars, pumpkins, trees and snowflakes for every season.

    Tips for a happy cookie day

    • Make the dough the day before so decorating day is all fun.
    • Roll dough between two sheets of parchment to avoid sticking and extra flour.
    • Dip cutters in flour so shapes release cleanly.
    • Set up a decorating station with a tray, toppings in muffin tins and wet wipes nearby.
    • Let the icing set for a few hours before stacking cookies.

    Storing your cookies

    Store decorated cookies in an airtight container at room temperature for up to a week. Unbaked dough can be wrapped well and frozen for up to 3 months. Thaw it in the fridge overnight before rolling.

    Safety note: raw dough contains raw egg and flour, so skip the taste-testing until the cookies are baked. An adult should handle the oven, and check toppings for allergies.

    Planning a decorating party? Pair these with our easy cupcake decorating ideas for kids. And if you’re baking for the holidays, our printable Christmas Eve Box and gift tags make cookie gifts extra special.

  • Easy Cupcake Decorating Ideas for Kids (That Actually Look Cute)

    Easy Cupcake Decorating Ideas for Kids (That Actually Look Cute)

    Decorating cupcakes is one of our favorite “arts and crafts” in the kitchen. Kaylee and I love baking together, and frosting is basically edible paint! These cupcake decorating ideas for kids are simple enough for little hands and still come out looking adorable.

    What you’ll need

    • Cupcakes, baked and completely cooled (homemade or from a mix)
    • Frosting (our easy buttercream recipe is below)
    • Butter knives, small spatulas or spoons for spreading
    • Zip-top bags or piping bags, plus a few piping tips (optional)
    • Sprinkles, mini chocolate chips, candy eyes, mini marshmallows and fruit
    • Small bowls for toppings and a tray or baking sheet to contain the mess

    Easy vanilla buttercream

    This makes enough to frost about 24 cupcakes.

    • 1 cup (2 sticks) unsalted butter, softened
    • 3 to 4 cups powdered sugar
    • 2 to 3 tablespoons milk
    • 2 teaspoons vanilla extract
    • A pinch of salt
    • Food coloring (gel colors give the brightest results)
    1. Beat the butter until smooth and creamy, about 2 minutes.
    2. Add 3 cups of powdered sugar a little at a time, mixing on low so it doesn’t fly everywhere.
    3. Add the vanilla, salt and 2 tablespoons of milk. Beat until fluffy.
    4. Too thick? Add a splash more milk. Too thin? Add more powdered sugar.
    5. Divide into bowls and let your kids choose and mix the colors.

    8 cupcake decorating ideas for kids

    1. The sprinkle dip

    Frost the cupcake, then turn it upside down and dip it into a bowl of sprinkles. It’s the easiest decoration there is, and kids love it.

    2. Silly faces

    Use candy eyes, a chocolate chip nose and a licorice or frosting smile. Let kids give each cupcake its own personality.

    3. Animal friends

    Mini marshmallows make great ears, and cookies can turn a cupcake into a bear, a bunny or a lion with a frosting mane.

    4. Rainbow swirl

    Put three colors of frosting side by side in one piping bag and pipe a swirl. Every cupcake comes out a little different.

    5. Flower garden

    Use a star tip to pipe little dots or rosettes. Add a green frosting leaf and you have a bouquet.

    6. Little monsters

    Bright green or purple frosting, lots of candy eyes and a messy “fur” texture made by dabbing with a fork. The messier, the better!

    7. Under the sea

    Blue frosting waves, gummy fish and crushed graham cracker “sand.”

    8. Holiday toppers

    Match the season: hearts for Valentine’s Day, pastel eggs for Easter, orange and black for Halloween, red and green for Christmas.

    Tips for decorating with kids

    • Chill the cupcakes for 15 minutes before frosting so crumbs don’t mix in.
    • Stand piping bags in a tall cup to make filling them easier.
    • Give each child a tray so sprinkles stay (mostly) in one place.
    • Use a “practice plate” so kids can try piping before decorating a cupcake.
    • Let go of perfect. Lopsided, sprinkle-covered cupcakes taste just as good.

    Safety note: an adult should handle the oven and hot pans. Check every topping for allergies, and supervise little ones around small candies, which can be a choking hazard.

    Want more kitchen crafts? Try our easy sugar cookies to decorate with kids, or read about why creative time is so good for kids.

  • 8 Benefits of Arts and Crafts for Kids (Plus Easy Ways to Start)

    8 Benefits of Arts and Crafts for Kids (Plus Easy Ways to Start)

    If you have ever watched a child concentrate on cutting out a paper heart, tongue poking out and all, you already know crafting is more than “just” play. The benefits of arts and crafts for kids reach into almost every part of how they grow: their hands, their thinking, their feelings and their confidence.

    In our studio, crafting is how Kaylee and I spend some of our favorite time together. Here are eight reasons we think every family should keep a craft bin within reach, plus easy ways to get started.

    1. Stronger fine motor skills

    Cutting, gluing, peeling stickers, threading beads and squeezing paint bottles all build the small muscles in the hands and fingers. Those are the same muscles kids use to hold a pencil, button a coat and tie their shoes. Crafting is practice that doesn’t feel like practice.

    2. Creativity and imagination

    A paper plate can become a lion, a sun or a spaceship. Open-ended crafts teach kids that there is more than one right answer, and that their own ideas matter. That kind of creative thinking carries over into storytelling, play and problem solving.

    3. Problem-solving skills

    “The glue won’t hold.” “My tower keeps falling.” “I need more purple.” Every craft is full of small problems to solve. When kids figure out a fix on their own, like using tape instead of glue or folding paper to make it stronger, they are learning to think things through.

    4. A healthy way to express feelings

    Young children don’t always have the words for big feelings, but they can draw them, paint them or build them. Art gives kids a calm, safe outlet, and it often opens up conversations. Try asking, “Tell me about your picture,” instead of “What is it?”

    5. Focus and patience

    Waiting for paint to dry, following steps in order and finishing a project all build attention span. Start with short, simple crafts and slowly try longer ones as your child’s focus grows.

    6. Confidence and pride

    There is nothing like a child holding up something they made and saying, “I did it myself!” Display their work on the fridge, a clothesline or a special shelf. It shows them their ideas are worth sharing.

    7. Early math, science and language

    Crafting is sneaky learning. Kids count pom-poms, sort colors, compare sizes, notice patterns, mix paint to see what happens and learn new words like “texture,” “symmetry” and “collage.” Reading craft instructions together also builds early reading skills.

    8. Time together

    Maybe the best benefit of all: crafting slows everyone down. Phones go away, hands get busy and conversations happen naturally. Some of our best talks happen over a messy table.

    Easy ways to bring more crafting into your week

    • Keep a craft bin with paper, crayons, glue sticks, safe scissors, tape and a few fun extras like stickers or pom-poms.
    • Pick a craft time, like Saturday mornings or after school on Wednesdays, so it becomes a habit.
    • Focus on the process, not the product. It doesn’t have to look like the picture. Let kids make choices.
    • Save recyclables: paper towel tubes, egg cartons and boxes are free craft supplies.
    • Protect your space with an old tablecloth or newspaper so you can relax about the mess.

    Crafts by age

    Toddlers (2–3)

    Big crayons, finger painting, sticker art and tearing paper. Keep projects short and supervise closely.

    Preschoolers (3–5)

    Paper plate animals, simple collages, play dough and safe-scissor cutting practice.

    Big kids (6+)

    Multi-step projects, beading, painting on canvas, simple sewing and crafts that follow written instructions.

    Looking for ideas to start with? Try our 5 Easy Paper Crafts to Make With Your Kids. And our K-ART Mini Makers Kits, with everything you need in one box, are coming soon!

  • Easy Christmas Elf Ideas for Busy Parents

    Easy Christmas Elf Ideas for Busy Parents

    If your family has a Christmas elf, you know the feeling: it’s 11 PM and the elf still hasn’t moved. Here are some of our favorite quick ideas from our own house, all made with everyday things.

    Quick and easy elf ideas

    • Breakfast surprise: the elf “cooks” chocolate eggs in a frying pan with a note: “I made you breakfast!”
    • Donut shop: set up a mini bakery with a few donuts and sprinkles.
    • Snowball fight: cotton balls or pom-poms in a basket make the perfect snowballs.
    • Banana faces: the elf draws silly faces on the bananas with a marker.
    • Stuck in bandages: the elf gets caught in bandages on the mirror and leaves a “HELP!” note.
    • Candy cane fishing: the elf goes fishing for crackers with a candy cane rod.
    • Art class: the elf sets up crayons or paints with a note asking your child to color together.
    • Measuring up: the elf stands on wrapping-paper “legs” to measure how much your child has grown.

    Tip: keep a little box of props (mini trees, a letter board, pom-poms, paper) so setups take two minutes.

    Want every night planned for you?

    Our printable Christmas Elf Kit includes 24 nights of easy ideas, a Welcome Back sign, an elf passport, a report card and excuse notes for the nights your elf “forgets” to move. Add your child’s and elf’s names in Canva and print at home.

  • How to Personalize Your Printables in Canva (Step by Step)

    How to Personalize Your Printables in Canva (Step by Step)

    All of our printables come with a Canva template link, so you can add your child’s name (and your elf’s name) before you print. You don’t need Canva Pro: a free account works perfectly.

    Step by step

    1. Download the instructions PDF from your Etsy purchase and click the Canva template link.
    2. Sign in or create a free Canva account, then click Use template for new design. This makes your own copy.
    3. Press Ctrl + F (Cmd + F on a Mac) and choose Find and replace.
    4. Type the sample name, type your child’s name, and click Replace all. Every page updates at once!
    5. Click any text box to change other words, like the elf name or a P.S. line.
    6. Click Share → Download → PDF Print and print at 100% on US Letter paper.

    Printing tips

    • Use cardstock for tags, cards and anything kids will handle a lot.
    • Choose “Actual size” or “100%” in your printer settings so nothing gets cut off.
    • Print one test page first to check colors.
    • No printer? Send the PDF to a local print shop or office store.

    Need help? Message us on Etsy and we’ll walk you through it.

  • 5 Easy Paper Crafts to Make With Your Kids This Weekend

    5 Easy Paper Crafts to Make With Your Kids This Weekend

    Some of our favorite afternoons in the studio start with a stack of paper and one question: “What should we make today?” These five crafts use things you probably already have at home, and each one takes less than an hour.

    What you’ll need

    • Colored paper or cardstock
    • Kid-safe scissors and a glue stick
    • Crayons, markers or paint
    • Tape, string and a few paper plates

    1. Paper plate animals

    Paint a paper plate, then add paper ears, googly eyes and a big smile. Lions, bunnies and pigs are always a hit.

    2. Handprint cards

    Trace your child’s hand on folded cardstock, cut it out and turn it into a card for grandma, a teacher or a friend.

    3. Paper chain countdown

    Cut strips of paper, write something fun on each one and loop them into a chain. Tear off one link each day before a birthday, a trip or a holiday.

    4. Torn-paper mosaics

    Draw a simple shape, then fill it with little torn pieces of colored paper. Tearing is great for little fingers, and no scissors are needed.

    5. Paper bag puppets

    Glue a face onto a lunch bag and put on a puppet show. Bonus points for a cardboard-box stage!

    Studio tip: lay down an old tablecloth or newspaper first, and let kids make their own choices. The goal is fun, not perfection.

    We’re working on hands-on craft kits with everything you need in one box. Want to hear when they launch?